 返回
返回顶部
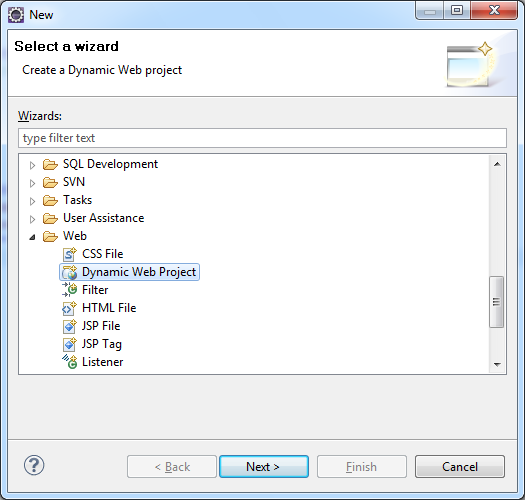
启动Eclipse IDE,选择文件>新建>项目。在项目向导中打开Web类型,在下拉列表中选择动态Web项目向导,然后点击下一步(图1)。
在打开的窗口中,填写项目名称(例如 sti_fx_web,如图2所示)。然后配置网络服务器,该应用程序将在该服务器上运行。
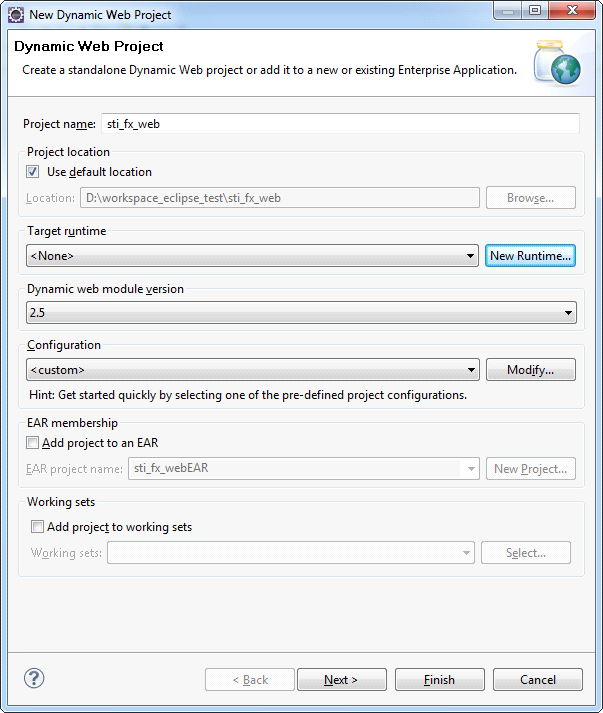
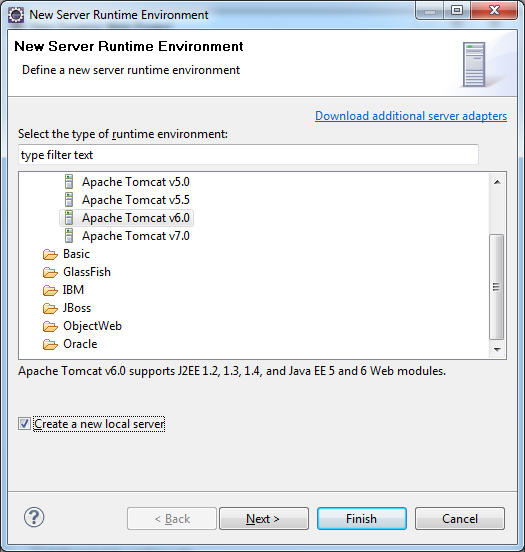
指定一个tomcat(Myeclipse中内置选默认)在目标运行环境中你会看到 ,如下图所示,因为你还没有为Apache Tomcat创建一个运行时。点击新建运行时,打开新建目标运行时向导。从列表中选择正确版本的Apache Tomcat。如图3所示,勾选创建一个新的本地服务器,然后点击下一步。
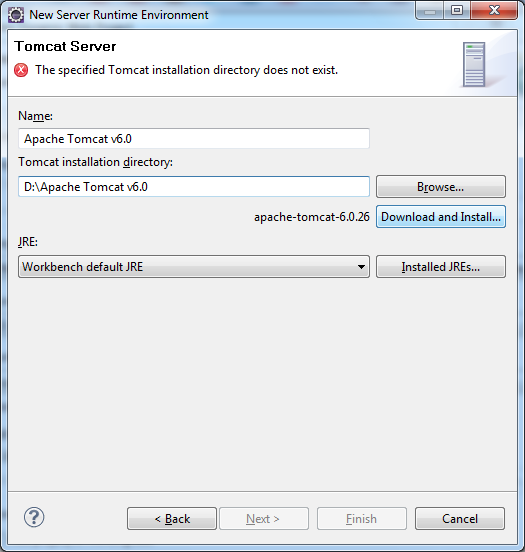
然后定义Tomcat的安装目录,如图4所示,Apache Tomcat已经安装在其中,或者需要安装在其中。如果没有安装,则点击下载和安装。所有字段都指定后,点击完成。
为了验证项目和Tomcat服务器,创建一个简单的JSP并将其部署在Tomcat上。要做到这一点,可以通过选择 “文件”>”新建”>”其他 “来创建一个新的JSP,或者使用上下文菜单,在 “项目浏览器 “中右击项目名称,选择 “新建”>”JSP文件”。在下一个窗口中(见图),定义目录为Web Content,在文件名中写上index.jsp。点击完成,使用默认模板创建页面。
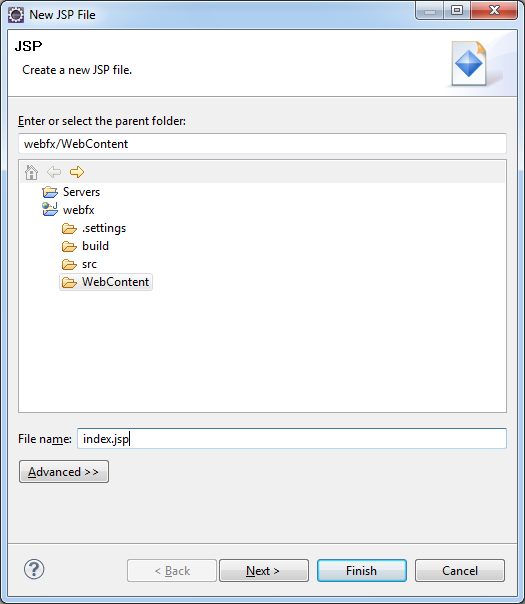
现在打开index.jsp并编辑它,使其显示当前日期。在代码中指定代码页。
<%@ page language="java" contentType="text/html; charset=UTF-8" pageEncoding="UTF-8" %>
<html>
<head>
	<meta http-equiv="Content-Type" content="text/html; charset=UTF-8">
	<title>stimulsoft reports</title>
</head>
<body>
	<%java.util.Date date = new java.util.Date();%>
	<h1>
		This index.jsp.<br>
		<%=date.toString()%>
	</h1>
</body>
</html>
现在把它部署到服务器上。为此,需要使用上下文菜单,右击项目名称,选择 “运行”>”运行为”>”在服务器上运行”。定义一个先前创建的服务器,然后点击完成。
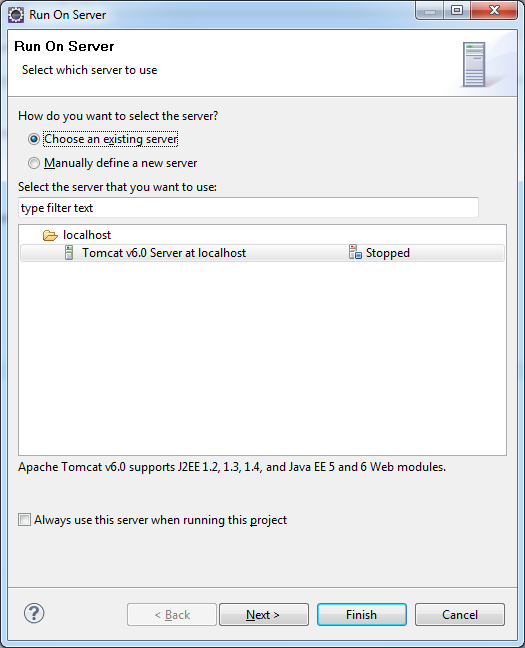
完成后启动运行查看效果,http://localhost:8080/{ProjectName},其中{ProjectName}是创建的项目名称,在我们的例子中是sti_fx_web。
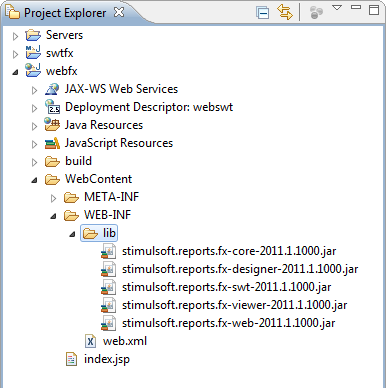
用报告设计器创建一个简单的页面。要做到这一点,把以下库放到WebContent/WEB-INF/lib/目录中:stimulsoft.lib.jar、stimulsoft.reports-base.jar、stimulsoft.reports-report.jar、stimulsoft.reports-flex.jar、stimulsoft.reports-web.jar。结果是,人们可以看到以下情况(如下图)。
接下来,打开web.xml进行编辑,它应该看起来如下。
<?xml version="1.0" encoding="UTF-8" ?>
<web-app xmlns:xsi="http://www.w3.org/2001/XMLSchema-instance"
	xmlns="http://java.sun.com/xml/ns/javaee"
	xmlns:web="http://java.sun.com/xml/ns/javaee/webapp_2_5.xsd"
	xsi:schemaLocation="http://java.sun.com/xml/ns/javaee"
	id="WebApp_ID" version="2.5">
	<display-name>sti_webviewer</display-name>
	<welcome-file-list>
		<welcome-file>index.jsp</welcome-file>
	</welcome-file-list>
	<!-- configuration, this parameter indicates the main application directory -->
	<servlet>
		<servlet-name>StimulsoftResource</servlet-name>
		<servlet-class>com.stimulsoft.web.servlet.StiWebResourceServlet</servlet-class>
	</servlet>
	<servlet-mapping>
		<servlet-name>StimulsoftResource</servlet-name>
		<url-pattern>/stimulsoft_web_resource</url-pattern>
	</servlet-mapping>
	<servlet>
		<servlet-name>StimulsoftAction</servlet-name>
		<servlet-class>com.stimulsoft.webviewer.servlet.StiWebViewerActionServlet</servlet-class>
	</servlet>
	<servlet-mapping>
		<servlet-name>StimulsoftAction</servlet-name>
		<url-pattern>/stimulsoft_webviewer_action</url-pattern>
	</servlet-mapping>
</web-app>
剩下的web.xml块保持不变,它定义了工作所需的Servlet。然后,编辑index.jsp(见下面的代码)。
<!DOCTYPEhtmlPUBLIC"-//W3C//DTD HTML 4.01 Transitional//EN">
<%@ page language="java" contentType="text/html; charset=UTF-8" pageEncoding="UTF-8" %>
<%@ taglib uri="http://stimulsoft.com/designer" prefix="stidesignerfx" %>
<%@ taglib uri="http://stimulsoft.com/viewer" prefix="stiviewerfx" %>

<html>
<head>
	<meta http-equiv="Content-Type" content="text/html; charset=UTF-8">
	<title>Stimulsoft Reports.Fx for Java</title>
</head>
<body>
<h1 align="center">My first report!</h1>
<stidesignerfx:iframe
	width="100%" height="90%" align="middle"
	styleClass="" frameborder="0" styleId=""
	marginheight="4" marginwidth="10" name="stiviewer"
	scrolling="no" style="" title="report"/>
</body>
</html>
在JSP中添加taglib指令(如下),它们将与页面上的自定义标签一起工作。
<%@ taglib uri="http://stimulsoft.com/designer" prefix="stidesignerfx" %>
<%@ taglib uri="http://stimulsoft.com/viewer" prefix="stiviewerfx" %>
添加一个标签,这是一个支持所有属性的html标签iframe的类似物。请看下面是应用程序部署的结果。
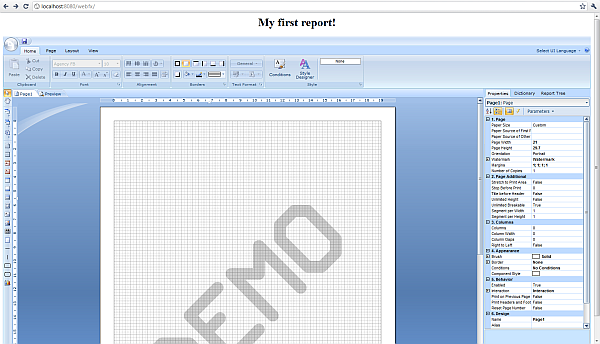
从上述标签中可知引入了两个组件,stidesignerfx和stiviewerfx,对于stiviewerfx,其工作方式相同。
<stidesignerfx:link text="a link for jumping to the Designer"/>
<stidesignerfx:button value="a button for jumping to the Designer"/>
<stidesignerfx:frame title="analog of the html tag frame which contains a Designer"/>
<stidesignerfx:iframe title="analog of the html tag iframe which contains a Designer"/>
所有这些都类似于类似的HTML标记,支持所有属性。将展开标准属性列表,以显示报告和设置报告变量。report=“SimpleList.mrt”属性打开名为SimpleList.mrt的报告。报告中的变量可以通过两种方式传递:
将variableStr属性的值设置为以下格式的字符串:“Variable1=value1&Variable2=value2”。在这种情况下,将在报告中传递两个变量Variable1和Variable2。例如,您需要编辑index.jsp文件,通过单击按钮打开名为MyFirstReport.mrt的报告,并且MyVar报告变量具有stidesignerfx值(见下方代码)。
<!DOCTYPEhtmlPUBLIC"-//W3C//DTD HTML 4.01 Transitional//EN">
<%@ page contentType="text/html;charset=UTF-8" import="java.util.*" %>
<%@ taglib uri="http://stimulsoft.com/designer" prefix="stidesignerfx" %>
<%@ taglib uri="http://stimulsoft.com/viewer" prefix="stiviewerfx" %>

<html>
<head>
	<title>Report</title>
	<meta http-equiv="Content-Type" content="text/html; charset=UTF-8" />
</head>
<body>
<stidesignerfx:button value="Run the report designer" report="MyFirstReport.mrt" variableStr="MyVar=stidesignerfx" />
</html>
还可以将参数作为映射传递给报表。重新设计我们的网页,如下代码。在这种情况下,名为MyFirstReport.mrt的报告将加载到报告中,并向其中传递两个参数。
<!DOCTYPEhtmlPUBLIC"-//W3C//DTD HTML 4.01 Transitional//EN">
<%@ page contentType="text/html;charset=UTF-8" import="java.util.*" %>
<%@ taglib uri="http://stimulsoft.com/designer" prefix="stidesignerfx" %>
<%@ taglib uri="http://stimulsoft.com/viewer" prefix="stiviewerfx" %>

<html>
<head>
	<title>Report</title>
	<meta http-equiv="Content-Type" content="text/html; charset=UTF-8" />
</head>
<body>
<%
	Map<String, String>variableMap= new HashMap<String, String>();
	variableMap.put("Variable1", "var1");
	variableMap.put("Variable2", "var2");
	request.setAttribute("myMap", variableMap);
%>
<stidesignerfx:iframe report="MyFirstReport.mrt" variableMap="myMap"
	width="100%" height="100%" align="right"
	styleClass="" frameborder="0" styleId=""
	marginheight="1" marginwidth="1" name="stidesignerfx"
	scrolling="no" style="" title="report" />
</body>
</html>
此处的数据作为HashMap传递,此参数应设置为请求或会话,并且其下的键应作为variableMap属性传递给标记。不允许应用两个属性variableMap和variableStr。
在运行之前,应配置应用程序。对于配置,使用web.xml中指定的my.servlet.ApplicationInitializer类。
package my.servlet;

import java.io.IOException;
import java.util.Properties;

import javax.servlet.ServletContextEvent;
import javax.servlet.ServletContextListener;

import my.actions.MyLoadAction;
import my.actions.MyLoadDataAction;
import my.actions.MyLocalizationAction;
import my.actions.MyMailAction;
import my.actions.MyRenderReportAction;
import my.actions.MySaveAction;

import com.stimulsoft.base.exception.StiException;
import com.stimulsoft.flex.StiFlexConfig;

/**
 * Application initialization.
 */
public class ApplicationInitializer implements ServletContextListener {

	@Override
	public void contextInitialized(final ServletContextEvent event) {
		try {
			// configuration application
			StiFlexConfig stiConfig = initConfigWithoutDir();
			// ---------------------------------------------------------
			// need to override the standard methods
			// another comment
			stiConfig.setLoadClass(MyLoadAction.class);
			stiConfig.setSaveClass(MySaveAction.class);
			stiConfig.setLoadDataClass(MyLoadDataAction.class);
			stiConfig.setMailAction(MyMailAction.class);
			stiConfig.setLocalizationAction(MyLocalizationAction.class);
			stiConfig.setRenderReportAction(MyRenderReportAction.class);
			// ---------------------------------------------------------

			StiFlexConfig.init(stiConfig);

			// set variable in servlet context attribute
			// Map<String, String> myVariableMap = new HashMap<String, String>();
			// myVariableMap.put("Variable1", "myVariableMap");
			// event.getServletContext().setAttribute("myMap", myVariableMap);
		} catch (Exception e) {
			throw new RuntimeException(e);
		}
	}

	@Override
	public void contextDestroyed(final ServletContextEvent event) {
		// empty
	}

	public StiFlexConfig initConfigWithoutDir() throws StiException, IOException {
		Properties properties = new Properties();
		// load your own Properties;
		// InputStream inStream = getClass().getResourceAsStream("RESOURCE_PATH");
		// properties.load(inStream);
		return new StiFlexConfig(properties);
	}
}
初始化报表
其中将定义包含文件stimulsoft.properties的主应用程序目录。为了保存或加载您自己的报告,需要配置中指定这些类,就像您可以指定从xml加载数据的类一样。类如下:列出MyLoadAction.java
package my.actions;

import java.io.InputStream;

import com.stimulsoft.actions.LoadAction;
import com.stimulsoft.library.LoadFileReport;

public class MyLoadAction extends LoadAction {
	@Override
	public InputStream load(String repotrName) {
		System.out.println("my load class" + repotrName);
		return new LoadFileReport().getReport(repotrName);
	}
}
MyLoadAction.java
package my.actions;

import com.stimulsoft.flex.StiSaveAction;
import com.stimulsoft.flex.utils.StiOperationResult;
import com.stimulsoft.flex.utils.StiSaveLoadFileReport;

public class MySaveAction extends StiSaveAction {
	@Override
	public StiOperationResult save(String report, String reportName, boolean newReportFlag) {
		System.out.println("must override this method to specify your own save report");
		return new StiSaveLoadFileReport().save(report, reportName, newReportFlag);
	}
}
MySaveAction.java
package my.actions;

import java.sql.Connection;
import java.sql.DriverManager;
import java.sql.SQLException;
import java.util.Properties;

import com.stimulsoft.flex.StiLoadDataAction;

public class MyLoadDataAction extends StiLoadDataAction {
	@Override
	protected String getConnectionString() {
		System.out.println("must override this method to specify your own connection string");
		// return
		// "Data Source=localhost\\SQLEXPRESS;Initial Catalog=Mybase;User ID=UserName; Password=Password;";
		return super.getConnectionString();
	}

	@Override
	protected String getUserName() {
		System.out.println("must override this method to specify your own user name");
		// return "UserName";
		return super.getUserName();
	}

	@Override
	protected String getPassword() {
		System.out.println("must override this method to specify your own password");
		// return "Password";
		return super.getPassword();
	}

	@Override
	protected String getQuery() {
		System.out.println("my Query " + super.getQuery());
		return super.getQuery();
	}

	@Override
	public Connection getConnection() throws ClassNotFoundException, SQLException {
		System.out.println("must override this method to specify your own connection");
		boolean overrideByConnectionString = getConnectionString() != null
			&& getConnectionString().equals("needOverride");
		boolean overrideByDataSource = getDataSourceName() != null
			&& getDataSourceName().equals("DataSourceOverride");
		if (overrideByConnectionString || overrideByDataSource) {
			Class.forName("com.microsoft.sqlserver.jdbc.SQLServerDriver");
			Properties info = new Properties();
			info.setProperty("user", "test");
			info.setProperty("password", "test");
			String connectionString = "jdbc:sqlserver://localhost\\SQLEXPRESS1:1433;databaseName=mybase;";
			return DriverManager.getConnection(connectionString, info);
		} else {
			return super.getConnection();
		}
	}
}
MyLoadDataAction.java
创建一个新的java项目。为此,请选择文件>新建>Java项目。在项目向导中输入项目名称,例如“swtfx”。在项目属性中,添加与“标准小部件工具包(SWT)”库的关系,以设计应用程序GUI。还添加用于处理报告的库:stimulsoft.reports.fx-core-2011.1.1000.jarstimulsoft.reports.fx-designer-2011.1.1000.jar、stimulsoft.reports.fx-viewer-2011.1.1000.jar、stimulsoft.reports.fx-swt-2011.1.1000.jar。

然后使用包my.swt和报告名称创建一个新类 Reports.java。
package my.swt;

import java.io.File;

import org.eclipse.swt.SWT;
import org.eclipse.swt.layout.GridData;
import org.eclipse.swt.layout.GridLayout;
import org.eclipse.swt.widgets.Display;
import org.eclipse.swt.widgets.Label;
import org.eclipse.swt.widgets.Shell;

import com.stimulsoft.StiConfig;
import com.stimulsoft.StiReportSwt;
import com.stimulsoft.library.StiException;
import com.stimulsoft.widgets.DesignerFx;

public class Reports {
	public static void main(String[] args) {
		initReport();
		Display display = new Display();
		Shell shell = new Shell(display);
		GridLayoutgridLayout = newGridLayout();
		gridLayout.marginHeight=0;
		gridLayout.marginWidth=0;

		shell.setLayout(gridLayout);
		shell.setText("My report");
		try {
			DesignerFx designer = new DesignerFx(shell, SWT.NO);
			GridDatagridData = new GridData(GridData.FILL_BOTH);
			designer.getComposite().setLayoutData(gridData);
		} catch (StiException e) {
			e.printStackTrace();
			Label label = new Label(shell, SWT.NONE);
			label.setLayoutData(newGridData(SWT.BEGINNING, SWT.CENTER, false, false));
			label.setText("failed to create reports designer");
		}
		shell.setMaximized(true);
		shell.open();

		while (!shell.isDisposed()) {
			if (!display.readAndDispatch()) {
				display.sleep();
			}
		}
		display.dispose();
	}

	Private static void initReport() {
		try {
			File stiDir = new File("D:/stimulsoft");
			StiConfig stiConfig = new StiConfig(stiDir);
			StiReportSwt.init(stiConfig);
		} catch (StiException e) {
			e.printStackTrace();
		}
	}
}
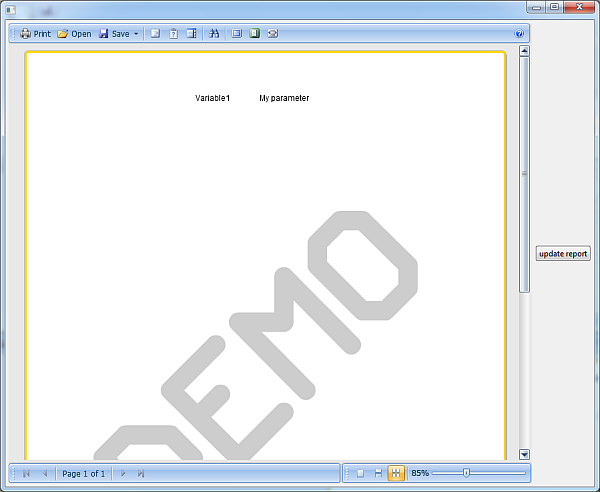
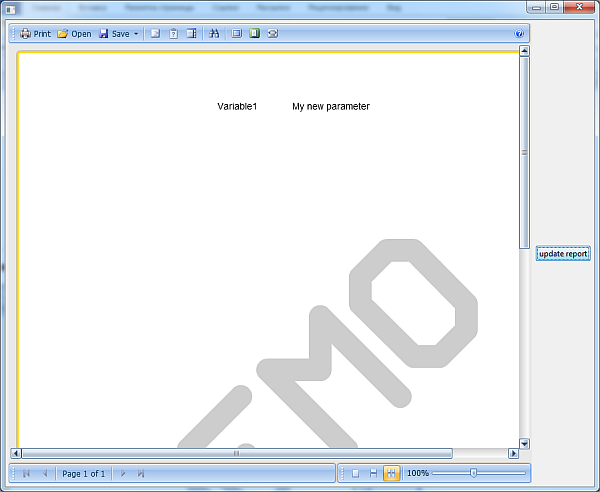
可以按事件分发和修改报告和选项。为此,按以下方式更改Reports.java中的代码。
package my.swt;

import java.io.File;
import java.util.HashMap;
import java.util.Map;

import org.eclipse.swt.SWT;
import org.eclipse.swt.events.SelectionEvent;
import org.eclipse.swt.events.SelectionListener;
import org.eclipse.swt.layout.GridData;
import org.eclipse.swt.layout.GridLayout;
import org.eclipse.swt.widgets.Button;
import org.eclipse.swt.widgets.Display;
import org.eclipse.swt.widgets.Shell;

import com.stimulsoft.StiConfig;
import com.stimulsoft.StiReportSwt;
import com.stimulsoft.library.StiException;
import com.stimulsoft.widgets.ViewerFx;

public class Reports {
	Display display = new Display();
	Shell shell = new Shell(display);
	private final ViewerFx viewer;

	public Reports() throws StiException {
		shell.setLayout(new GridLayout(2, false));

		Map<String, String> params = new HashMap<String, String>();
		params.put("Variable1", "My parameter");

		viewer = new ViewerFx(shell, SWT.NO, "SimpleList.mrt", params);
		GridDatagridData = new GridData(GridData.FILL_BOTH);
		viewer.getComposite().setLayoutData(gridData);

		Button button = new Button(shell, SWT.PUSH);
		button.setLayoutData(new GridData(SWT.BEGINNING, SWT.CENTER, false, false));
		button.setText("update report");
		button.addSelectionListener(new SelectionListener() {
			public void widgetSelected(SelectionEvent arg0) {
				try {
					Map<String, String>paramsNew = new HashMap<String,String>();
					paramsNew.put("Variable1", "My new parameter");
					viewer.assignReport("SimpleList.mrt", paramsNew);
				} catch (Exception e) {
					e.printStackTrace();
				}
			}

			public void widgetDefaultSelected(SelectionEvent arg0) {
			}
		});
		shell.setMaximized(true);
		shell.open();

		while (!shell.isDisposed()) {
			if (!display.readAndDispatch()) {
				display.sleep();
			}
		}
		display.dispose();
	}

	public static void main(String[] args) {
		try {
			initReport();
			new Reports();
		} catch (StiException e) {
			e.printStackTrace();
		}
	}

	private static void initReport() throws StiException {
		StiConfigstiConfig = new StiConfig(new File("D:/stimulsoft"));
		StiReportSwt.init(stiConfig);
	}
}
使用组件呈现报告时,应在运行此应用程序之前配置应用程序。应创建以下方法。
private static void initReport() throws StiException {
	File stiDir = new File("D:/Stimulsoft");
	new Resource().copyAll(stiDir);
	StiSwtConfig stiConfig = new StiSwtConfig(stiDir);
	StiReportSwt.init(stiConfig);
}
其中将定义包含stimulsoft.properties文件的主应用程序目录。初始化与web应用程序的初始化相同。也可以为设计器和查看器覆盖应用程序的端口。例如:
private static void initReport() throws StiException {
	// Initialization is identical to that described for the web application
	File stiDir = new File("D:/Stimulsoft");
	new Resource().copyAll(stiDir);
	StiSwtConfig stiConfig = new StiSwtConfig(stiDir);

	// ---------------------------------------------------------
	// need to override the standard methods
	// another comment
	stiConfig.setLoadClass(MyLoadAction.class).setSaveClass(MySaveAction.class);
	stiConfig.setXMLDataClass(MyXMLDataAction.class).setLoadDataClass(MyLoadDataAction.class);
	stiConfig.setViewerPort(7845).setDesignerPort(8789);
	// ---------------------------------------------------------

	StiReportSwt.init(stiConfig);
}
也可以将设计器和查看器组件用作对话框。组件类别:
com.stimulsoft.widgets.DesignerFxDialog
com.stimulsoft.widgets.ViewerFxDialog
使用设计器组件的示例 DialogReports.java:
package my.swt;

import java.io.File;

import org.eclipse.swt.SWT;
import org.eclipse.swt.events.SelectionEvent;
import org.eclipse.swt.events.SelectionListener;
import org.eclipse.swt.layout.GridLayout;
import org.eclipse.swt.widgets.Button;
import org.eclipse.swt.widgets.Display;
import org.eclipse.swt.widgets.Shell;

import com.stimulsoft.StiConfig;
import com.stimulsoft.StiReportSwt;
import com.stimulsoft.library.StiException;
import com.stimulsoft.widgets.DesignerFxDialog;

public class DialogReports {
	public static void main(String[] args) {
		try {
			initReport();
			Display display = new Display();
			Shell shell = new Shell(display);
			shell.setLayout(new GridLayout());
			final DesignerFxDialog dialog = new DesignerFxDialog(shell,
				SWT.RESIZE | SWT.DIALOG_TRIM | SWT.APPLICATION_MODAL);
			dialog.setSize(1250, 800);
			Button button = new Button(shell, SWT.PUSH);
			button.setText("open dialog");
			button.addSelectionListener(new SelectionListener() {
				public void widgetSelected(SelectionEvent arg0) {
					try {
						dialog.open("SimpleList.mrt");
					} catch (StiException e) {
					}
				}

				public void widgetDefaultSelected(SelectionEvent arg0) {
				}
			});
			shell.pack();
			shell.open();

			while (!shell.isDisposed()) {
				if (!display.readAndDispatch()) {
					display.sleep();
				}
			}
			display.dispose();
		} catch (StiException e) {
			e.printStackTrace();
		}
	}

	private static void initReport() throws StiException {
		File stiDir = new File("D:/stimulsoft");
		StiConfig stiConfig = new StiConfig(stiDir);
		StiReportSwt.init(stiConfig);
	}
}
至此,Stimulsoft Report.Java的一般报表功能示例就介绍完了,当然还有Dashbord的案例使用方法没说呢(JS前端就不说了吧),线上的示例Demo大家感兴趣可以访问 https://demo.stimulsoft.com/ ,也欢迎加Myeclipse的QQ群 742336981 一起互动。